|
Rover V8 TR4A
Okay, so I don't know when to quit.
After the less than successful Judson Supercharger installation,
I knew that I really wanted more power, but it had to be
reliable. The other rule was that it had to be true to the
character of what was done back in the 60's, so this ruled out a
modern engine swap. Finally, it could not involve cutting up the
TR4A sheet metal, I did not want to touch that lovely body
shape. The ideal engine would allow me to double my power,
retain the same weight, allow the installation of a 5 speed
transmission, and fit the available space. While at the shows
over the years, I have seen all manner of engine swaps (RX7
Rotary, Various V8's, V6's and hot 4 cylinders) but none of
these really look correct. I wanted to have a period swap, so no
fuel injection or other modern systems. So the obvious choice
was an old Rover V8. I researched the dimensions and determined
that it would roughly fit in the space available. I then
started the usual Ebay searches and research on the engine in
it's various versions (Buick/Pontiac/Olds, Rover cars, Rover
trucks, MGB/TR8, etc...). This engine has really been around.
While I found a lot of options on Ebay, ultimately I ended up
talking to a guy online that had an old Rover PB 3500 engine, a
Camaro T5 and a bell housing for sale. Figuring that this was a
fast way to get started, I drove to New Jersey and bought it on
the spot. While the engine was as described (very low mileage
and a high compression (10.5-1), it needed a full rebuild. I was
very surprised at how clean it was on the inside, having none of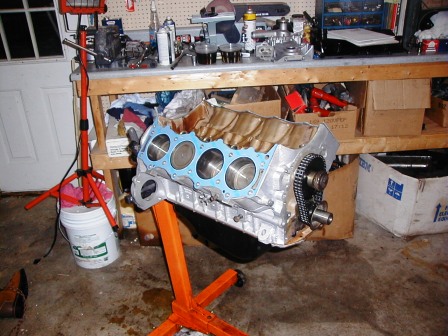 the usual oil buildup on the pushrod galleries. I also bought
the book "Tuning Rover V8 Engines, David Hardcastle.
the usual oil buildup on the pushrod galleries. I also bought
the book "Tuning Rover V8 Engines, David Hardcastle.
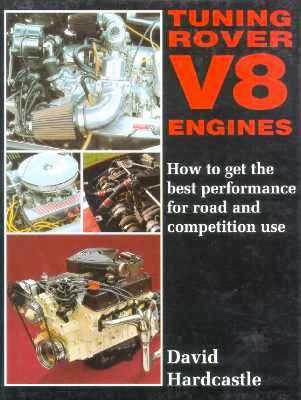 This
book was very valuable in that it went over all the various
pieces that can be swapped (or not) between the various years of
the Rover and GM versions of this engine. Because of this book,
I ended up spending many hours on Ebay, hunting down various
components that were better than what came with my engine. This
and advice from vendors like Ted Schumacher at TSImported
Automotive and Dan LaGrou at D&D really helped me get this
project together. The final specs of the engine are as follows: This
book was very valuable in that it went over all the various
pieces that can be swapped (or not) between the various years of
the Rover and GM versions of this engine. Because of this book,
I ended up spending many hours on Ebay, hunting down various
components that were better than what came with my engine. This
and advice from vendors like Ted Schumacher at TSImported
Automotive and Dan LaGrou at D&D really helped me get this
project together. The final specs of the engine are as follows:
Rover PB 3500 Block, crank and pistons
(10.5 - 1), Crower 276 degree - 488 lift Cam,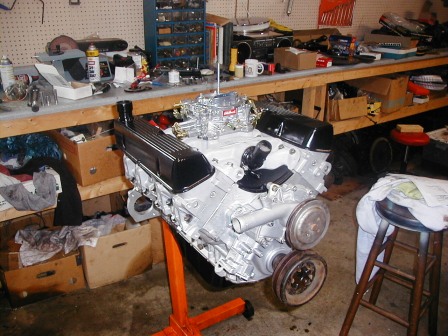 Heavy
duty double roller chain and gears, Heavy duty lifters, ARP main
bearing studs and ARP rod bearing bolts. Rover SD1 Heads
with three angle valve job and new valves (bigger ports then the
stock heads), MGB block hugger headers, Offenhause 4 barrel
manifold and Edelbrock 500 CFM carb. Mallory magnetic
distributor, Mallory 8 mm wires, Bosch Platinum plugs, TS
Automotive custom flywheel, Weber clutch, hydraulic throw out
bearing, D&D GM bell housing, Camaro T5 5-speed, Hurst
Shifter, D&D custom driveshaft,
Rover SD1 valve covers, Buick 215 water pump, GM alternator,
custom motor mounts. I am estimating output at 215-225 based on
what I have researched on this engine. Heavy
duty double roller chain and gears, Heavy duty lifters, ARP main
bearing studs and ARP rod bearing bolts. Rover SD1 Heads
with three angle valve job and new valves (bigger ports then the
stock heads), MGB block hugger headers, Offenhause 4 barrel
manifold and Edelbrock 500 CFM carb. Mallory magnetic
distributor, Mallory 8 mm wires, Bosch Platinum plugs, TS
Automotive custom flywheel, Weber clutch, hydraulic throw out
bearing, D&D GM bell housing, Camaro T5 5-speed, Hurst
Shifter, D&D custom driveshaft,
Rover SD1 valve covers, Buick 215 water pump, GM alternator,
custom motor mounts. I am estimating output at 215-225 based on
what I have researched on this engine.
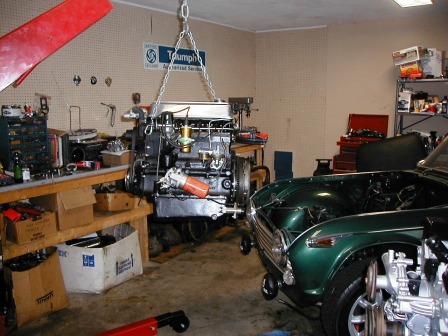
Okay, so now I had an engine for the car. Now I have make it fit
in the available space! I first pulled the old engine and
transmission (not that old, they have less than 10,000 miles on
them) and cleaned up the engine bay. These old engines do throw
a lot of oil even in just 10k miles. With the engine bay cleaned
up, first order was to lower the engine in the bay and see what
needed to be done. I did this exercise probably 20 times as I
checked, and rechecked possible engine/transmission locations.
Front, back, height, all had to be checked and rechecked to
ensure the engine would clear the hood and that I could route
the steering around engine.
 The
final result was based on using motor mounts bolted to the stock
cross member on the frame and rising up to the stock Rover
rubber mounts. Based on this position, the headers could be fit
around the A-arm mounts on the frame (barely) and the only sheet
metal to be The
final result was based on using motor mounts bolted to the stock
cross member on the frame and rising up to the stock Rover
rubber mounts. Based on this position, the headers could be fit
around the A-arm mounts on the frame (barely) and the only sheet
metal to be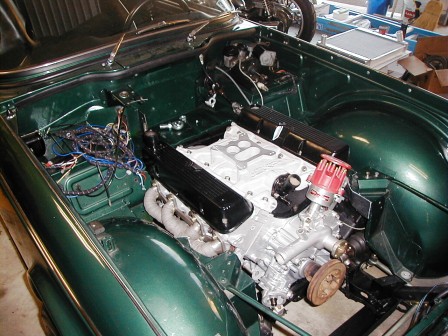 trimmed was the small "points" on the upper wheel well around
the front A-arm and spring tower. This could be done and since
this is missing on both older TR4's and the 250's, probably no
one would notice unless it is pointed out. So out came the
sawsall and this was quickly trimmed. With the "points" out of
the way, the engine could be brought forward a few inches and
the transmission shifter was roughly in the stock position. Next
step was to weld up some motor mounts and bolt it together. The
transmission mount is a combination of the stock TR4A rear mount
and the Camaro brackets on the tail of the transmission. D&D
built me a custom drive shaft to my specifications and all
bolted together as it should. The exhaust is made up of down
pipes that mate to the stock TR4A rear dual mufflers for a true
dual exhaust. Result is quieter than expected, but nothing can
hide that V8 rumble!
trimmed was the small "points" on the upper wheel well around
the front A-arm and spring tower. This could be done and since
this is missing on both older TR4's and the 250's, probably no
one would notice unless it is pointed out. So out came the
sawsall and this was quickly trimmed. With the "points" out of
the way, the engine could be brought forward a few inches and
the transmission shifter was roughly in the stock position. Next
step was to weld up some motor mounts and bolt it together. The
transmission mount is a combination of the stock TR4A rear mount
and the Camaro brackets on the tail of the transmission. D&D
built me a custom drive shaft to my specifications and all
bolted together as it should. The exhaust is made up of down
pipes that mate to the stock TR4A rear dual mufflers for a true
dual exhaust. Result is quieter than expected, but nothing can
hide that V8 rumble!
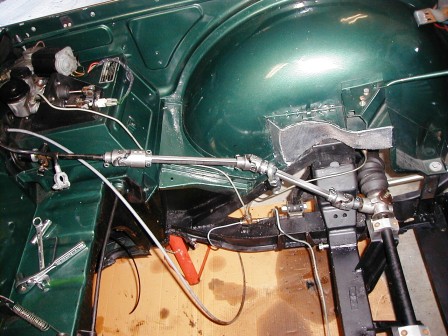 Next
step is to pull the engine back out and build the new steering
system. The only safe way to do this is use Borgeson steering
components. This company specializes in the parts to build a
heavy duty steering system that allows you to take the Triumph
splined rack fitting and adapt it to a 3/4 D shaft, using a
combination of flex joints, vibration dampeners and mountings, a
steering system can be routed around the V8 block and headers.
The result is a stronger solution with more feel than the stock
rubber donut system. Here is the routing for the steering. With
final engine placement, there were a few adjustments that were
necessary to clear everything, but this is the basic layout of
the steering system. Next
step is to pull the engine back out and build the new steering
system. The only safe way to do this is use Borgeson steering
components. This company specializes in the parts to build a
heavy duty steering system that allows you to take the Triumph
splined rack fitting and adapt it to a 3/4 D shaft, using a
combination of flex joints, vibration dampeners and mountings, a
steering system can be routed around the V8 block and headers.
The result is a stronger solution with more feel than the stock
rubber donut system. Here is the routing for the steering. With
final engine placement, there were a few adjustments that were
necessary to clear everything, but this is the basic layout of
the steering system.
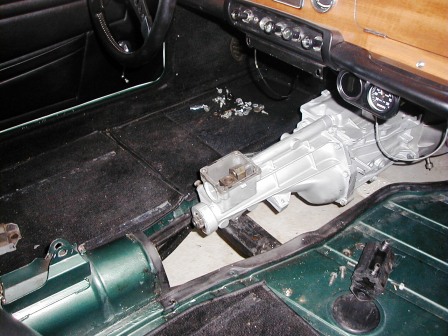
With the steering settled, it was now time
to get everything back in the car. The engine and transmission
installed back with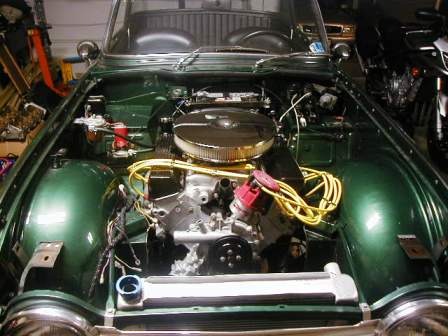 little hassle. All the components had been installed and removed
enough time so I could do it in record time (and with the clutch
problems I had, I would get more practice). With everything
bolted up, it was time to route the fuel lines, exhaust, wiring
and cooling system. I bought an aluminum "generic" radiator and
had to make my own mounts to hold this in place. Since this is
for a GM 350, I should have plenty of cooling, with the electric
radiator fan and a
little hassle. All the components had been installed and removed
enough time so I could do it in record time (and with the clutch
problems I had, I would get more practice). With everything
bolted up, it was time to route the fuel lines, exhaust, wiring
and cooling system. I bought an aluminum "generic" radiator and
had to make my own mounts to hold this in place. Since this is
for a GM 350, I should have plenty of cooling, with the electric
radiator fan and a
 thermostat.
I'll build a radiator shroud when this is completed. I hooked up
the radiator and then mounted the GM alternator. The
instructions on the VTR site for installing a alternator in a
Triumph were very helpful and I modified my voltage regulator
box to hide the conversion. The difference in the headlights and
interior lights is amazing. The TR generator is such a bad joke!
I used to have to rev the engine at a stop light to be able to
see. Once everything was back together, I topped up all the
fluids and hooked up the battery. With some fear and excitement,
I cranked it over. Nothing! After several days of trying
everything (fuel, spark, etc...) I decided that I must have the
cam in backwards (180 degrees out of phase), sure enough upon a
front engine tear down, it was backwards. This is the second
time I built an engine and thought that TDC was correct only to
find it was the compression stroke. In a few hours, I had the
engine running on the jack stands. Okay, so after shifting the
car on the stands a few times and running the engine for 1/2
hour at various speeds to check for leaks, etc... I was ready to
go around the block. I lowered the car to the ground, backed it
out of the garage and started it up. When I tried to put it in
gear, it ground like the clutch was not working. Okay, so back
in the garage to check the clutch. Everything appeared in order,
but what works (at no load) on the stands does not work on the
ground. So I ended up pulling the transmission. Double checked
and triple checked the hydraulic throw out bearing clearance,
replaced the clutch master cylinder with a Wildwood unit, bleed
the system multiple times, but still no clutch. At TRF in
August, I bought a special flywheel from Ted that will allow me
to switch to a different clutch to see what the problem is. It
appears that the pressure plate may not be releasing correctly
with the Buick flywheel. The new flywheel lets me try a GM, Ford
or Rover clutch so I'll get this resolved this winter so we have
the car on the road this spring. Watch this space for an update
of how it drives! Based on how it sounds, I think a brake
upgrade will be the next step. thermostat.
I'll build a radiator shroud when this is completed. I hooked up
the radiator and then mounted the GM alternator. The
instructions on the VTR site for installing a alternator in a
Triumph were very helpful and I modified my voltage regulator
box to hide the conversion. The difference in the headlights and
interior lights is amazing. The TR generator is such a bad joke!
I used to have to rev the engine at a stop light to be able to
see. Once everything was back together, I topped up all the
fluids and hooked up the battery. With some fear and excitement,
I cranked it over. Nothing! After several days of trying
everything (fuel, spark, etc...) I decided that I must have the
cam in backwards (180 degrees out of phase), sure enough upon a
front engine tear down, it was backwards. This is the second
time I built an engine and thought that TDC was correct only to
find it was the compression stroke. In a few hours, I had the
engine running on the jack stands. Okay, so after shifting the
car on the stands a few times and running the engine for 1/2
hour at various speeds to check for leaks, etc... I was ready to
go around the block. I lowered the car to the ground, backed it
out of the garage and started it up. When I tried to put it in
gear, it ground like the clutch was not working. Okay, so back
in the garage to check the clutch. Everything appeared in order,
but what works (at no load) on the stands does not work on the
ground. So I ended up pulling the transmission. Double checked
and triple checked the hydraulic throw out bearing clearance,
replaced the clutch master cylinder with a Wildwood unit, bleed
the system multiple times, but still no clutch. At TRF in
August, I bought a special flywheel from Ted that will allow me
to switch to a different clutch to see what the problem is. It
appears that the pressure plate may not be releasing correctly
with the Buick flywheel. The new flywheel lets me try a GM, Ford
or Rover clutch so I'll get this resolved this winter so we have
the car on the road this spring. Watch this space for an update
of how it drives! Based on how it sounds, I think a brake
upgrade will be the next step.
Spring 2004 - Okay so it was time
to get this project moving again. Armed with the new flywheel, I
started attacking the clutch problem. I decided that I would
replace the clutch, disk, use the new flywheel and also rebuild
the T5 to make sure that everything was correct. I bought most
of the parts on Ebay and/or Napa/AutoZone. The T5 was stripped
down and found to be in good condition. I replaced some of the
synchronizers and adjusted the shims for the input shaft bearing
but other than that, it was basically a strip and re-assemble.
This also allowed me to seal the case with permatex which
stopped the leak it had since it was first installed (must be
because it was installed in a Triumph). Before I finished with
the transmission, I took the opportunity to center the clutch
with the input shaft to make sure it was perfectly centered as
below.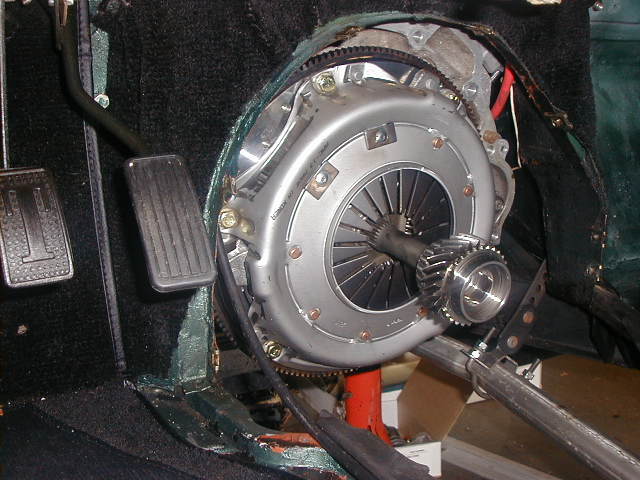 Now that the clutch was done, I finished
the transmission and reassembled everything. Much to my dismay
after spending 5 hours on a Saturday (after many weekends of
preparation), the clutch still did not work. I pumped the clutch
pedal several times and it ended up leaking brake fluid out a
fitting on the Mcleod unit. After this, I had enough with the
Mcleod hydraulic throw out bearing. I know that people say that
these units are fine and work great, but I have had to pull the
transmission on this car so many times, that it is not funny
anymore. So my next plan was to switch to a conventional clutch
fork and external slave.
Now that the clutch was done, I finished
the transmission and reassembled everything. Much to my dismay
after spending 5 hours on a Saturday (after many weekends of
preparation), the clutch still did not work. I pumped the clutch
pedal several times and it ended up leaking brake fluid out a
fitting on the Mcleod unit. After this, I had enough with the
Mcleod hydraulic throw out bearing. I know that people say that
these units are fine and work great, but I have had to pull the
transmission on this car so many times, that it is not funny
anymore. So my next plan was to switch to a conventional clutch
fork and external slave.
After a trip to the junk
yard to look at the possibilities, I decided that a GM/Camaro
clutch fork should work together with the matching throw out
bearing and pivot bolt. After consulting with D&D, I discovered
that my aftermarket bell housing would not work as it did not
have enough clearance for the fork to exit the bell housing. So
I had them send me everything I needed. I listed the hydraulic
bell housing on Ebay as well as the Mcleod and had both reach the
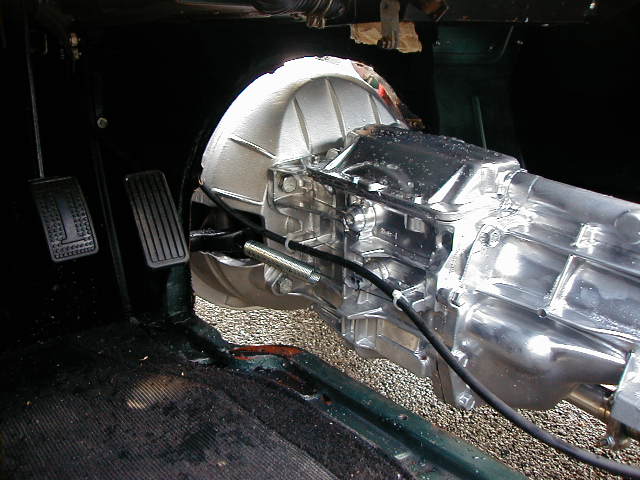
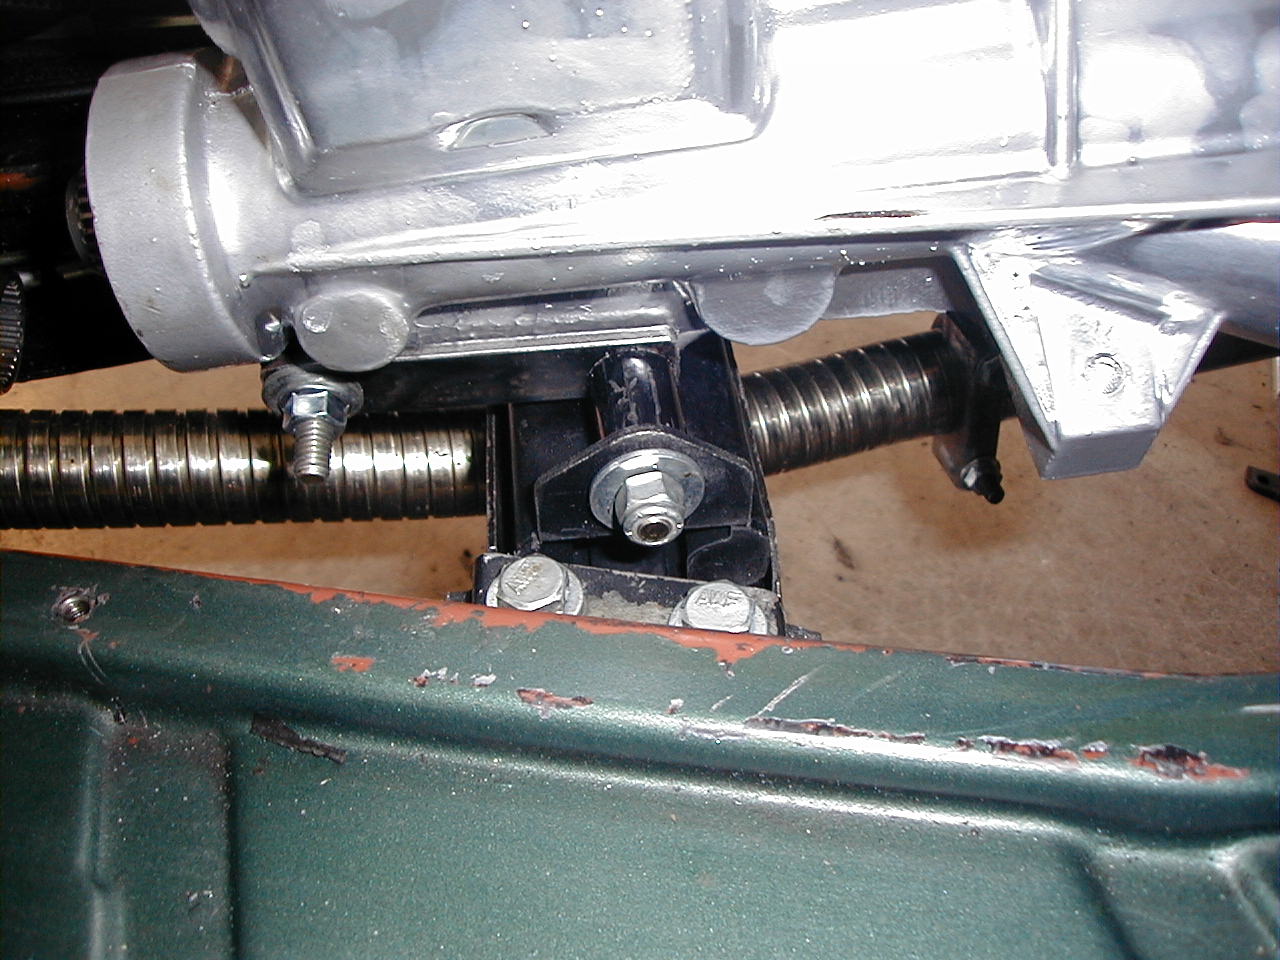
asking price in a few hours! Okay, so now I have a conventional
clutch mechanism, but what to use for a slave cylinder? At first
I considered using the stock TR4 unit, but after looking at how
it would mount, decided to look for an alternative. I looked at
the Napa store at various Toyota, Nissan and GM slaves, but none
seem to suit. Finally, I found the Wilwood pull slave on the
internet. Now here was a slave that would mount under the engine
(and clear the transmission tunnel). It also mounts in a unusual
way being that it is a pulling unit, it mounts using a threaded
rod. This allows me to connect it the engine mount and it
pulls the clutch fork perfectly. It also allows me to use the
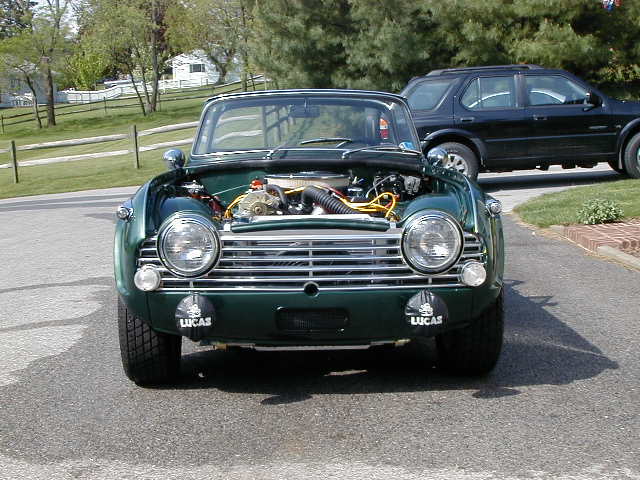
current clutch hydraulic pipes. So all this was done the
following Saturday and I started the car and gave it a test.
Guess what, I now have a working clutch. It will need some
adjustments and I have to fix a leaking fuel pump before I go on
any major rides, but the TR4A- V8 was able to travel up and down
my road under it's own power!.
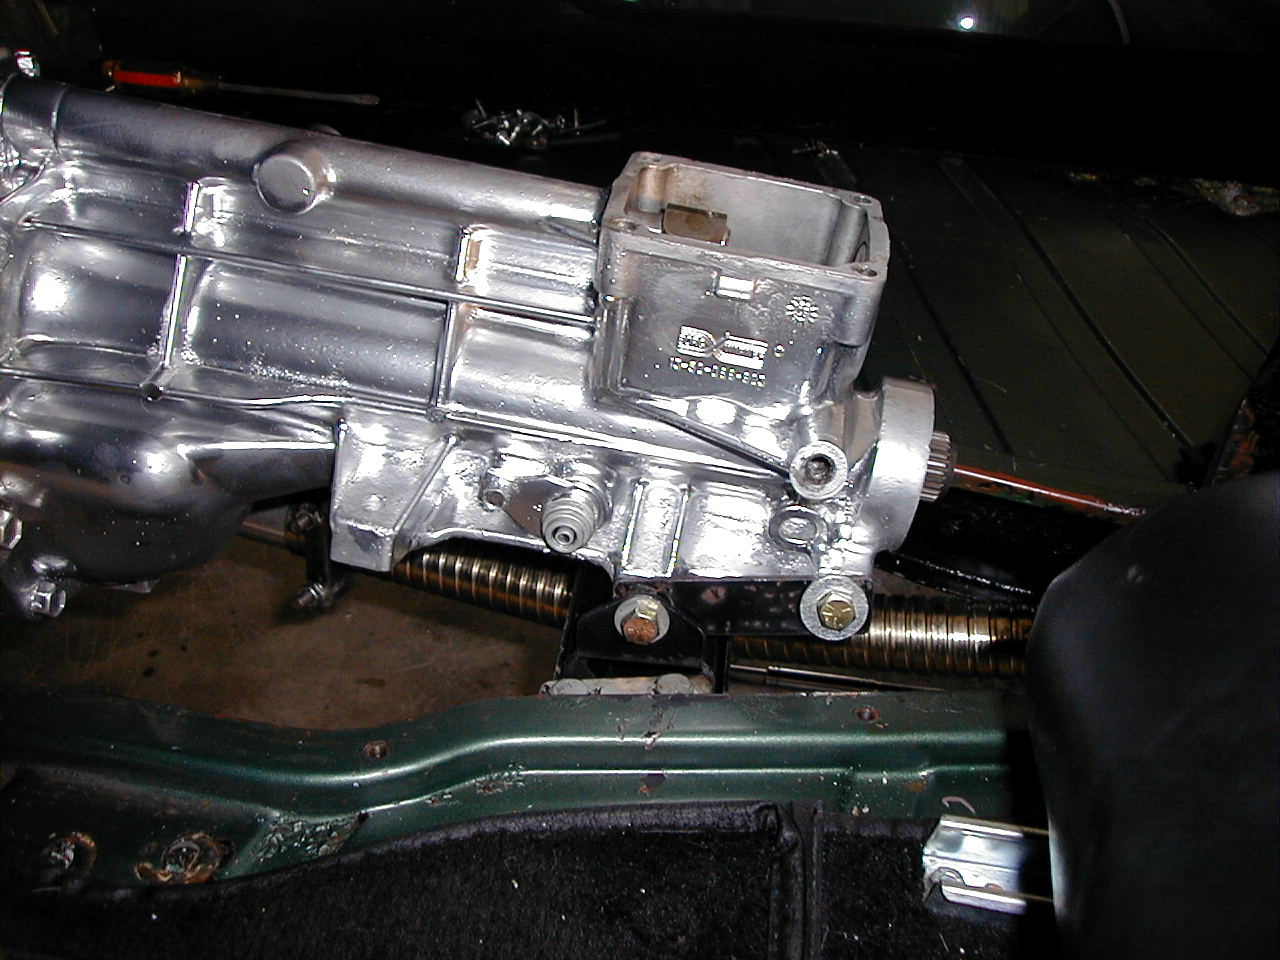
Below are a few more pictures of the
clutch fork. I'll do some other pictures from underneath so you
can see the mounting for the slave cylinder soon. I have also
included the rear mount as I strengthened it with some steel
braces.
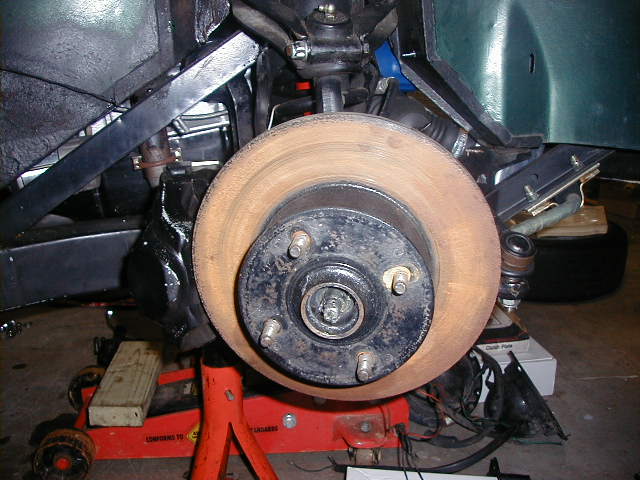
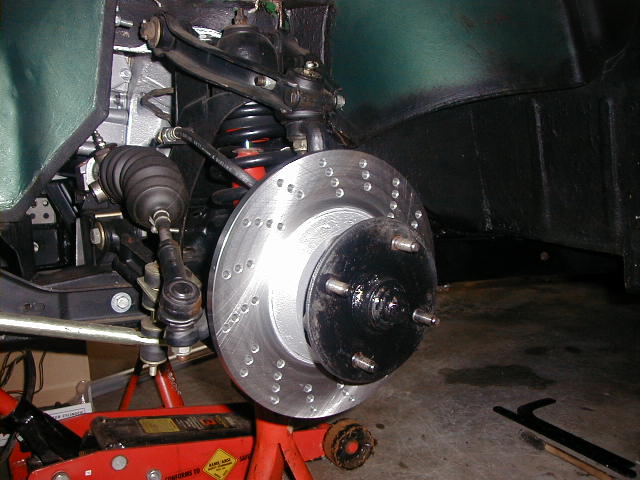
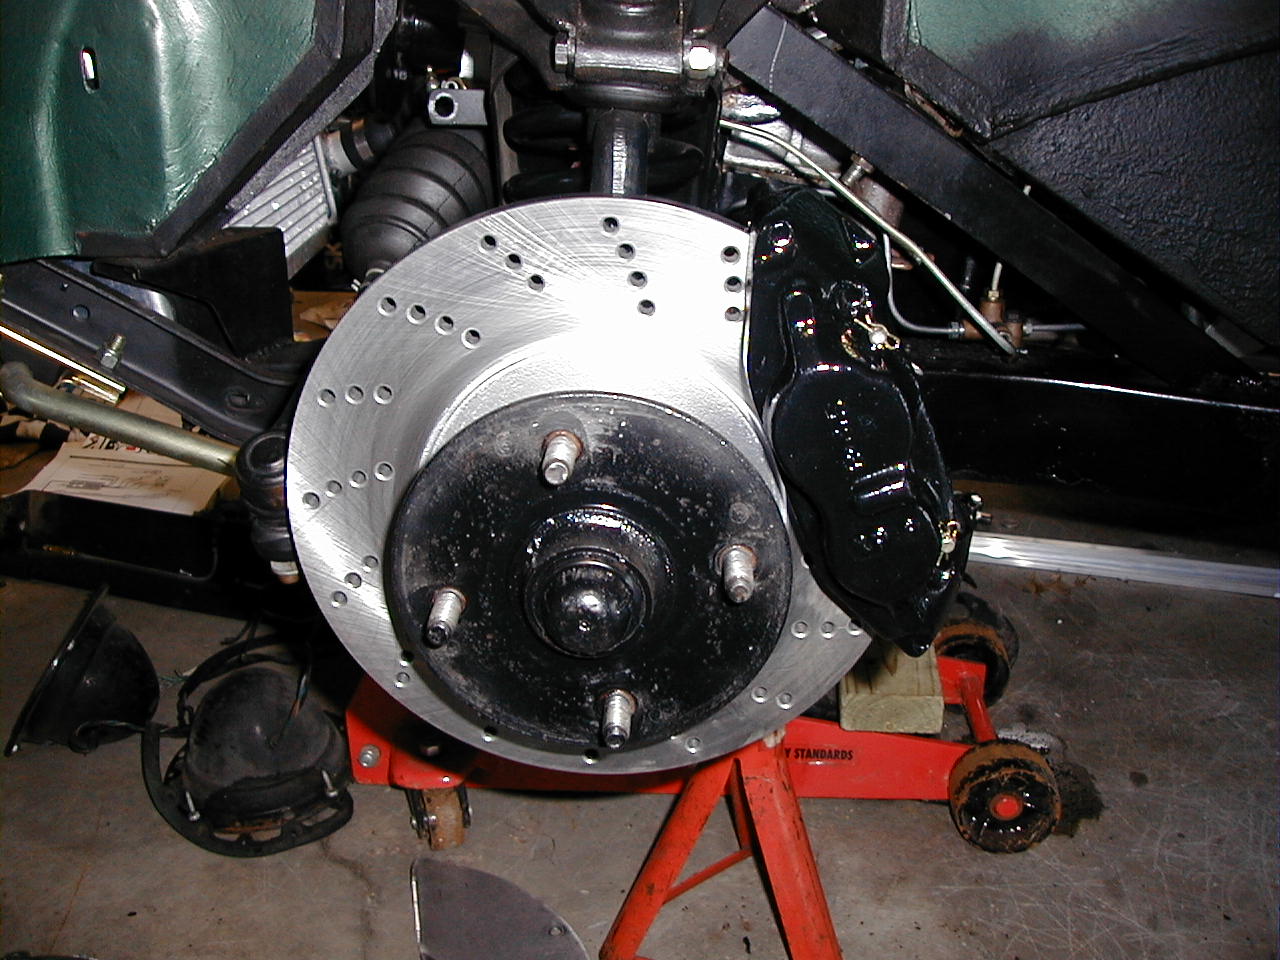
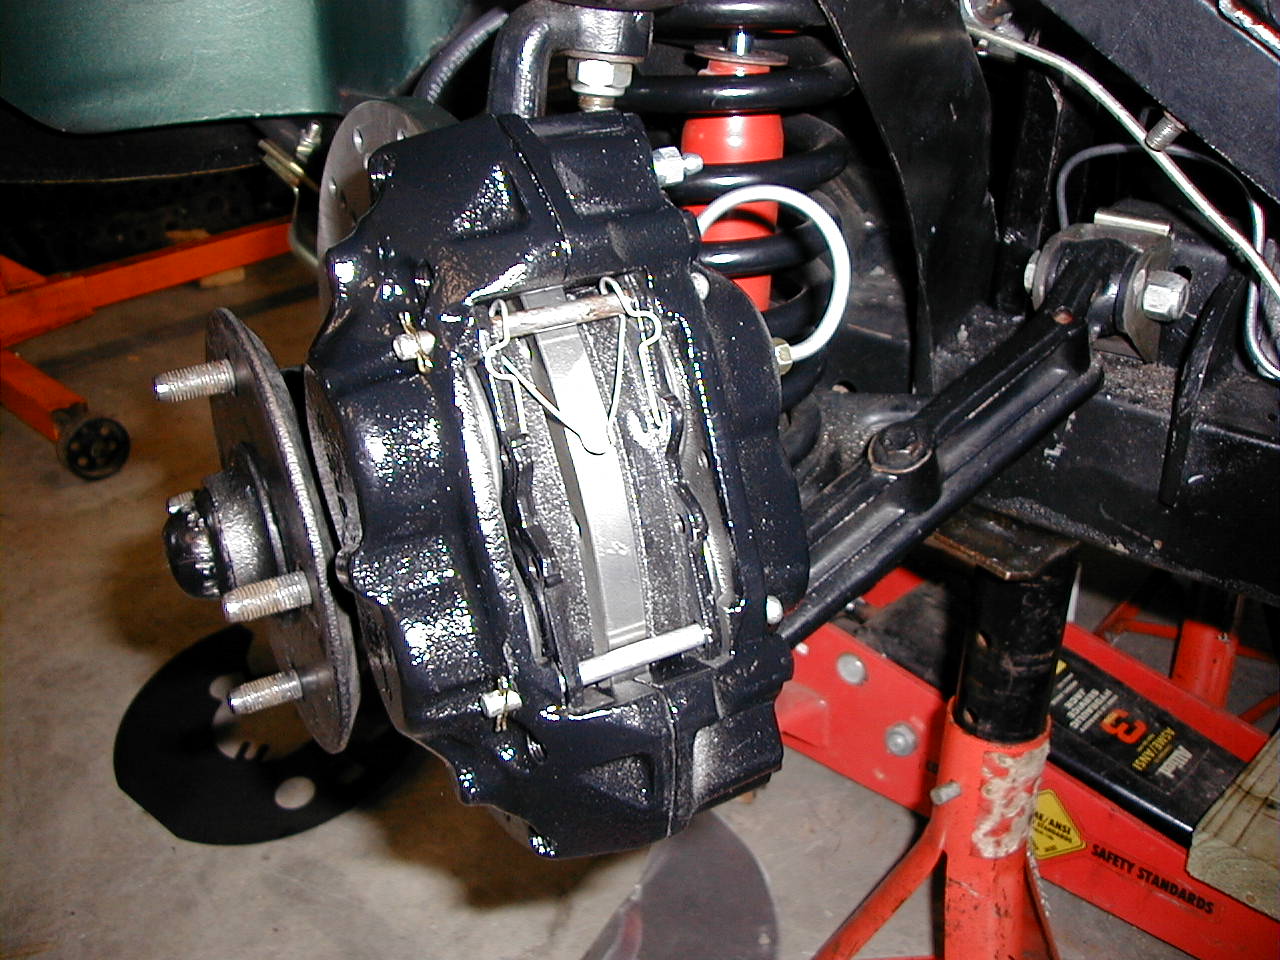
While I was looking at the car this
spring, I took at look at what was possible as far as brake
upgrades are concerned. The goal was to upgrade the braking
without making major changes. The VTR site has a tech article on
using Toyota 4 piston calipers as a straight swap. Turns out you
an get these at Autozone for as little as $35 each if you have
the old cores. I bought an old set on Ebay for $25 and
confirmed they fit. The high performance pads ended costing more
than the calipers. I also bought a set of cross drilled rotors (Brembos)
to complete the high performance brake upgrade. Below are old
and new photos, as well as a comparison of the calipers. This is
a simple upgrade that should be quite effective.
 |